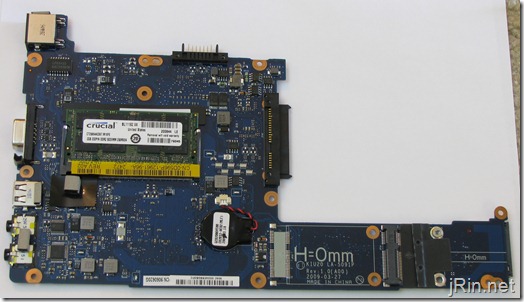
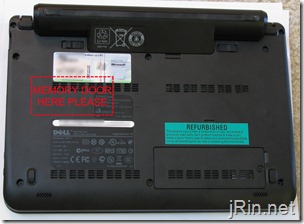
As opposed to simply providing a removable door (like they did for the mini-card) to upgrade the memory, Dell decided to make it difficult by requiring you to dismantle the entire laptop… (but what do I know, maybe it would affect structural integrity or something to add a door?).
So, in light of this fact, here is a step-by-step how-to video (and pictures) on how to upgrade the memory! All you will need is time, a set of mini screw drivers, and patience!
While following this video, I would highly recommend having the Dell created service manual to follow along in case anything shown here is unclear/etc:
http://support.dell.com/support/edocs/systems/ins10v/en/sm/memory.htm#wp1180987
Since YouTube caps videos at 10 minutes, I broke it up into:
Taking it apart and adding the memory:
and then another putting it all back together:
Or, or those who prefer a guide using pictures as opposed to video:
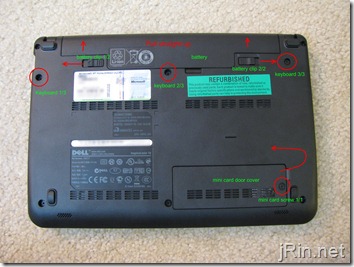
1. Start out by removing the battery by sliding out the battery lock clips, and then pull the battery straight out. Then remove the (3) screws holding in the battery and the (1) screw securing the mini-card door, and remove the door.
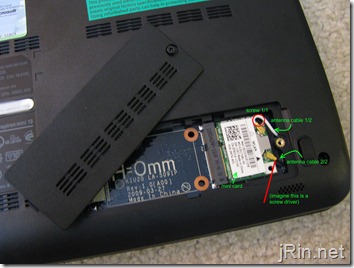
2. Remove the mini card. Gently pry off the two antenna cables by, for example, placing a small screw driver underneath the cables where the gold metal and cable meet – then softly prying it up. Then, remove the single screw holding the mini card down, then pull out the card.
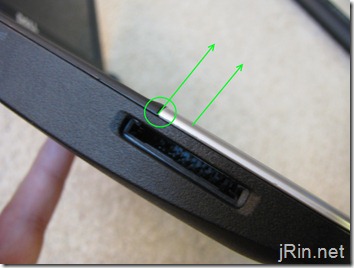
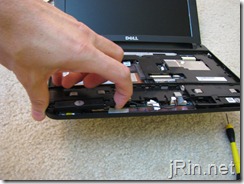
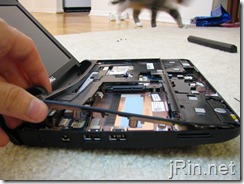
3. Remove the keyboard and it’s ribbon cable, as well as the ribbon cable for the touchpad. You’ll need to basically use a very thin flat head screwdriver, credit card, etc in order to ‘pry up’ the keyboard from the center near the screen. Once you are able to get your fingers underneath it, just pull up on the right and left sides until the laptop is free: 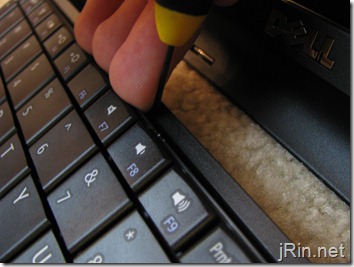
(there are small clips holding the eayboard in on the right and left, just pry the keyboard up as if there is a hinge at the palm rest and it’ll come loose). Don’t pull the keyboard too far from the chassis as it’s still connected via it’s ribbon cable: 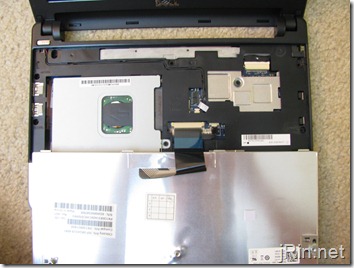
With the keyboard free, remove the ribbon cable(s) by sliding out the left and right grey “clips†holding the ribbon cable(s) in. (they will “slide out†about 2mm or so) 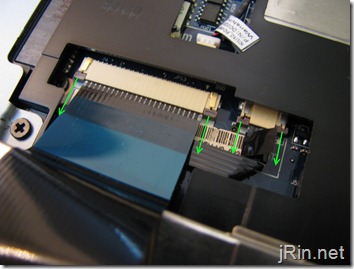
4. Remove the palm rest. This can be a bit frustrating, but basically you want to use your thumbnail / thin creditcard to start prying from the left and right edges, where it meets the bracket:
5. Prep for palm rest bracket removal. First, go ahead and remove the 1 screw holding in the hard drive, and slide it out (blue). Then, unplug the 3, or 4 if you have bluetooth, cables (green). Finally, unscrew the 4 screws securing the palm rest bracket from the top (red). 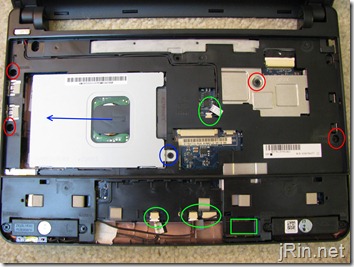
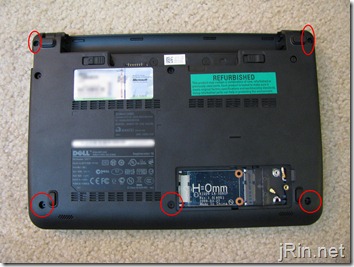
Turn the netbook over and remove the 5 remaining screws securing the palm rest from the bottom:
6. Actually remove the palm rest bracket. Dell suggests starting from the hinges and working down, but I was unable to undo the clips here to start. So instead, I started at the speakers (which are already loose), and started prying off the bracket from here. Basically, just start pulling the entire bracket up, working your way from the palm rest area up towards the hinges, until it is removed. (that being said, once I started getting the bracket unclipped half way to the hinges, I was able to pry off the hinge-area):
7. Prep system board (motherboard) removal. Almost there! Now you need to unplug the 3 remaining cables (green) and 2 screws (red). It may not matter, but when removing the display cable (top right), pull from the middle of the cable, as that’s where all the wires are bunched: 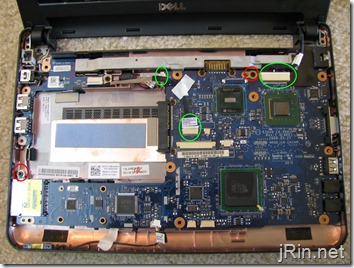
8. Remove the motherboard. The board is now completely loose from the chassis and can be removed! Be careful not to nick it on anything while pulling it off, but it’s relatively easy not to. Flip over the board, release the memory and pop in your 2GB stick:
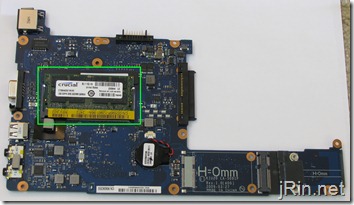
9. Put everything back together. Basically, just follow all theses steps in reverse, power on the system, and enjoy your 2GB Dell Mini 10v!
Have any questions or run into problems? Find an easier way to pry apart the palm rest bracket or etc? Let everyone know in the comments!
For those of you who haven’t bought a 2gb stick yet, there are plenty on amazon that would work fine (too bad prices for ddr2 memory aren’t as cheap as they used to be) – I will keep this list updated with the cheapest amazon memory prices as I see them:
And for those interested in the products I used to help create this post:

Worked perfectly, took me about 25 min, you’re a rock star. Thanks!
Only caveat is that the memory module does not seat 100% in the base. Works fine, though.
Great guide. I only used the pictures/written guide and was able to do this in about 40 minutes, without a scratch on the mini. The 2GB works so much better with Windows 7. With only 1GB, the netbook was using 67% memory just sitting idle. Much more responsive now. Kudos!
How can youo tell if you have the 10V?
Clyde, go to http://www.dell.com and go to Support and Drivers. Enter your service tag from the bottom of your laptop and it will tell you which model you have.
Hello,
Will work with Kingston MacBook 2GB DDR3 1066MHz SODIMM Memory????
If not what is the best memory i can buy for it.
Please answer this i really need to know.
Thank you verry much.
@sad_zeus, no, this netbook (as well as any other I’ve seen), will only take DDR2
Thankx for this very detailed guide. I’ve never had a Dell (macs only), and you made this easy. 35 minutes later, without a scratch, it worked PERFECTLY!!!
Thx again!!! Gary
I just did the upgrade. It was easy. But I was very stupid and impatient and cracked the palmrest upon removal. Called Dell to have a replacement part sent.
Thank you so much!! It was pretty easy to do… tedius… but easy!! :D you rock!
Indeed it is a tedious procedure. I had my Dell Mini 10V for about a month before upgrading the RAM to 2Gb. Thanks for the help on how to upgrade the RAM. I want to warn future upgraders that Dell is getting smart and using Loctite blue on the screws holding everything together. So when you unscrew the screws from the case be very careful since the metal threads of the holes the screws go into areheld in by plastic! I ended up breaking 3 of those plastic thread holders and had to superglue them back to the underside of the palmrest frame. Otherwise I would just have screw holes there and that palmrest frame as they call it (not the palmrest itself) would only be held down by 2 of the 5 screws that do hold it down. I hope this helps someone else to not break those things removing the screws!
This was great thanks. I’ve never taken a computer apart before but your video was really clear. It took me about 40 minutes and putting the thing back together again was surprisingly easy! I’m now thinking of upgrading the hard drive since I now know how to access it.
what harddrive specs would you recommend for the 10v to get optimum performance?
going to order ram and do this tut – was thinking though the hard drive upgrade idea is fantastic… i have dualboot xphome/ubuntu-karmic – wanted to put win7 over xp, but resisted due to the 1gb of ram…
thanks for taking the time to put this together & share the info
Hey, thanks for the tutorial. As I’m new very “wise” with computers, I’d gracefully respect if somebody would find me a 2GB ram chip for the Mini 10v on the UK eBay and post the link either here, or email me at nial-10@hotmail.com with it. Many thanks!
Excellent video tutorial – combined with Dell Service Manual all went extremely well. I found one problem with the Blue Coated screws; one would not seat – but not a crucial problem. I was careful to ensure all the screws were returned to there original place.
Great job and thank you for the assistance.
Thanks for the great tutorial. All went very well and I was finished in about an hour. I also had the blue-coated screws, but had no problems with them.
Great guide! My mini 10v works better than it did now with Mac OS X on it.
Like Dale said you have to be careful with some of the screws, I only broke one of the plastic screw holders, but it was the one for the hard drive so I’m not that worried.
Thank You very much!
Fantastic job in documenting that upgrade. Keep up the great work. Was thinking about getting a mini 10v but since your article will wait till it comes with the N450 atom and then wait for you to upgrade that.
James you Rock!! This worked perfect!! Thank you for taking the time to put the instructions and video clips together. Keep on keeping on!!
This is a great tutorial. Awesome work. It took me about 25 minutes from start to finish. Without this, I would have been at this for hours.
I have Dell inspiron mini 10, does it have same memory type (RAM) as 10v ? I guess yes … want tro confirm.
crabMAN – my understanding on the Dell Mini 10 is that the RAM is soldered onto the system board; thus the upgrade tutorial for the Dell Mini 10v will not work for the Mini 10. Checkout the Dell Forums to confirm.
@crabMan, keijoh is correct – the Dell Mini 10 has it’s memory soldered in and is not removable (or upgradeable); With the Mini 10, you are stuck with 1GB
Great work on the tutorial! You made it very easy to follow along with the video and picture instructions. Thanks!
Yo! Great “how-to”! I’m really only a moderate techy person but I just bought a Dell Mini 10v and it is soooo slow! I really want to upgrade the RAM, I have a dumb question, will those links posted above work for my Mini 10v? I assume yes but I wanted to make sure. Also I was interested in installing a MAC OS on my dell, how easy/hard is that? Where might I find a “how-to” on that? THANKS!
Aaron K…
Yes this will work on your Dell Mini 10v (not the regular mini 10)…
for help installing (dual booting) MAC OS goto:
[url]www.mydellmini.com[/url]
What are you?
A LEGEND THATS WHAT!!!!!
That took 15 mins from start to finish and and no time did I feel out of my depth because your instructions were so detailed and I’m not a techy person either…
Thanks so Much!
Hi James & all,
First, this is awesome! thank you so much. I just bought a 10v. the included memory is a “Dual In-line Memory Module,1GB,800MHZ,DDR2,1GBIT.” i was wondering if a 2gb 667 mhz ddr2 can be used and will be an improvement? (due to 667<800mhz). OR if i should just go with VS2GSDS800D2 2 GB PC2-6400 800MHz 200-pin DDR2 SODIMM? I'm relatively handy but just wondering if there's a big difference between 667 and 800mhz?
this is very much appreciated from one DIY'r to another.
@Trent, there’s no reason to go with ddr2-800 for this particular netbook specifically as it’s FSB isn’t high enough. That being said, it will still work, and you may find a deal for 800 vs 667, in which case get the 800 of course (plus, it may be useful to get 800 in case you ever decide to use it in a different laptop which may support 800fsb).
Thanks James. I just found it odd the provided was an 800 and made me wonder. Ordering I am! thanks for the timely reply.
Picked up a Corsair 2GB from zipzoomfly for an incredible $9.99 including free shipping. Will be installing update this weekend, looks like a piece of cake thanks to this! Thanks James!
Just wanted to drop a note of thanks. Your video was concise and very easy to follow. 2GB RAM on my 10v is going to be so sweet. You played no small part in making that a reality for me.
Thank you!
Just FYI.. I have a brand new mini 10v and it differs from what you show.
There is no access panel on the back.
The ram is now more easily accessible. You only have to remove the keyboard and it is to the right under a protective cover. You don’t have to remove the whole mainboard.
I just bought a new one also, and mine is exactly as James shows, and the upgrade went very smoothly. Used the Crucial memory, no problems. I agree hardest part is getting the palm rest up, but taking it slowly finally got it. I did have to disconnect the “mouse pad” ribbon as well, not shown – I think Dell has upgraded this to a “side to side” one piece pad? (Shows my total lack of tech-saavy, and I was able to do this!) Thanks a million for putting this on here, the extra RAM is fantastic and could never have figured this out alone!
followed the youtube video and everything works! you rock dude!
Followed the videos, and it was absolutely perfect.
I had only had problems with screws on the right-hand-side of the machine (when viewed from the back …. the side where the WLAN component is…..)
But everything else was perfect.
Could not have done this without the video, especially putting everything back together correctly!!
Well Done..and my eternal thanks.
The 2Gb is so much better.
what is the best brand for the 2gb ram chip?
This worked the first time with no problems at all! Thanks.
I’m in the process of hackintoshing….will the
Corsair Memory VS2GSDS800D2 i bought work for this? or do i need “crucial” or other MAC specific RAM?
I know this wasn’t covered here but just wanted to see if you guys new and make sure.
Thanks a lot as always!
Trent
hi there – so a mini 1010 is not upgradable at all ?
Worked like a charm. Thanks for the tutorial. Found the Ram for $30 on dell. http://slickdeals.net/forums/showthread.php?t=1817061
You are the MAN! Can’t go wrong, take your time to do it, no need to rush, steady pace, the laptop looks exactly as post open.
Worked great, thanks for taking the time to put up this guide. I went with the Crucial, no problems at all.
Mike
Will the memory upgrade allow me to install windows 7 home premium or upgrade without halting the system? I tried to do the upgrade with 1G and it worked, but then my computer ended up getting a system halt blue screen at startup. Eventually Dell had to send me a new hard drive with windows 7 starter on it. I am upgrading the memory next week with high hopes of then later uprgrading to windows 7 home premium again, and not having any problems. I’m definitely a noob. Any feedback will be appreciated. I read up on here daily. Thanks.
I installed windows 7 home premium before I did the ram upgrade and it worked fine. Must have been the hard drive issue. Good luck.
I used a 20.00 msdn code I bought on eBay, so I hope that had something to do with it. Also, it might have been a 64 bit code. Dunno, but then I also had a mac dock downloaded on there…just blindly searching for an explanation here, or hopefully like you said it was the hard drive. Thanks for responding.
hi there – so a mini 1010 is not upgradable at all ?
steve on: 7 February 2010 at 1:41 pm
hi there – so a mini 1010 is not upgradable at all ?
Mini 10-1010? Definitely not. All sources I’ve seen say its soldered in, fixed, not upgradable.
great, thank you for your job with this short video guide.
The upgrade worked great – except one bit one of the screw enclosures snapped off. So the top right screw on the back will not go in anymore. But I can live with that, no real issues I can see coming from it, though as it had fallen out, spent half an hour trying to figure out where it had fallen out of! But great tutorial, the dell mini 10v community owe you one!
Also – what hard drive is everyone using – the standard 160GB drive? Solid state? Or other?
Pingback: Review: Dell Inspiron Mini 10 « No sé ni cómo te atreves