**this guide is being worked on……untill this message is gone!!**
first off, the switch that came with mine (the thin on/off) HAS to be used (or you can subsitute it for any other momentary/push button switch
first off, this is my first ‘diy’, and in the process, I didn’t think to take pictures of actually sliding on the gauges past the needles and unhooking the speedo cable, but I’ll try to describe the process as best as I can. also, if ya’ll want bigger (or smaller!) pictures (2500×1600+) lemme know and I can upload them as well. — and mods/whoever, please add/remove/combine/etc as seen fit w/the OP’s guide or ya’lls thoughts!!
the way i found easiest to do this was to leave the steering wheel on (couldn’t get it off and I didn’t want to worry w/the air bag, though i doubt there would’ve been an issue), taking off the column cover, and taking apart the gauge cluster while still in the dash (since I couldn’t get it out in one piece past the steering wheel) — here’s what I did (though maybe not the best/easiest/etc…)
tools I used:
* long and short philips screw drivers (screws of course)
* flat head screw driver (for prying stuff out and such)
* hot glue (to guide the wires of the guages where i wanted them)
* super glue (to secure gauges that didn’t have screws)
* dremel (or a knive, needle nose pliers, or anything that could “rip a path” for the wires to go through
* pliers (or wrench/rachet set to remove the dimmer switch)
* drill (for making new ground, or simply find an already existing ground)
##############################################
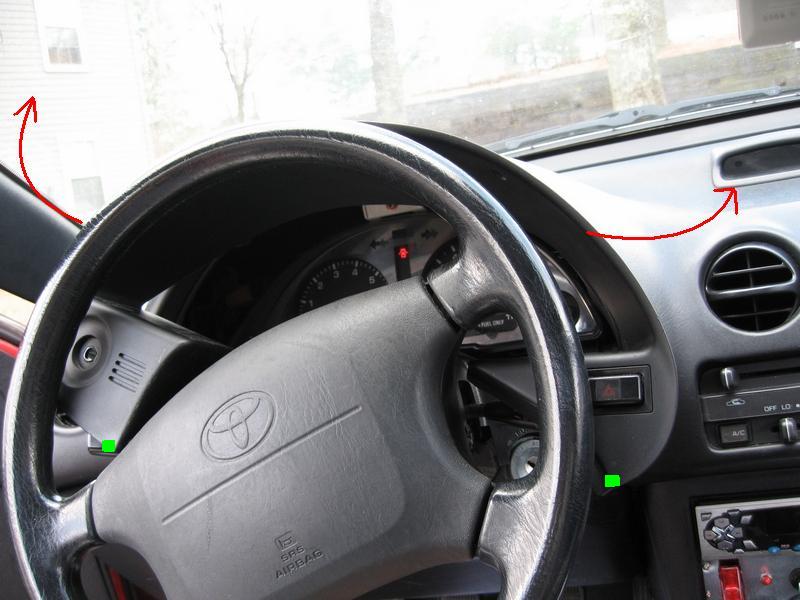
1. start out be removing these screws. (pic 1 & 2)
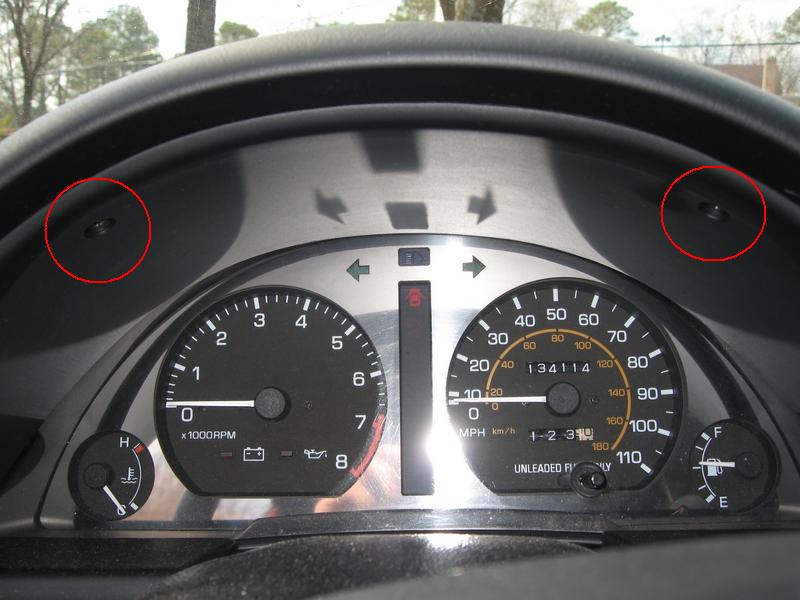
pic 01
pic 02
##############################################
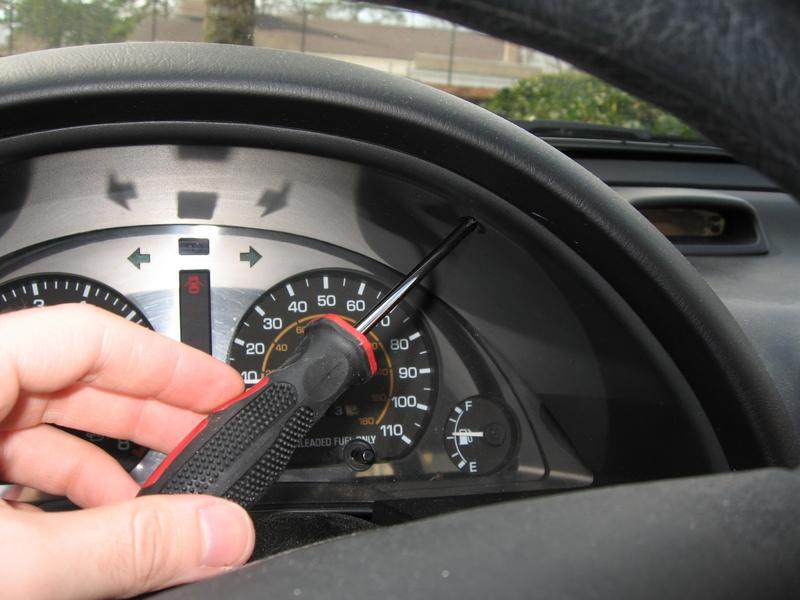
2. remove the 4 screws holding the steering column cover together (these are philips screws and you’ll need a ‘longer’ screwdriver to get them out) – pic 03
pic 03
##############################################
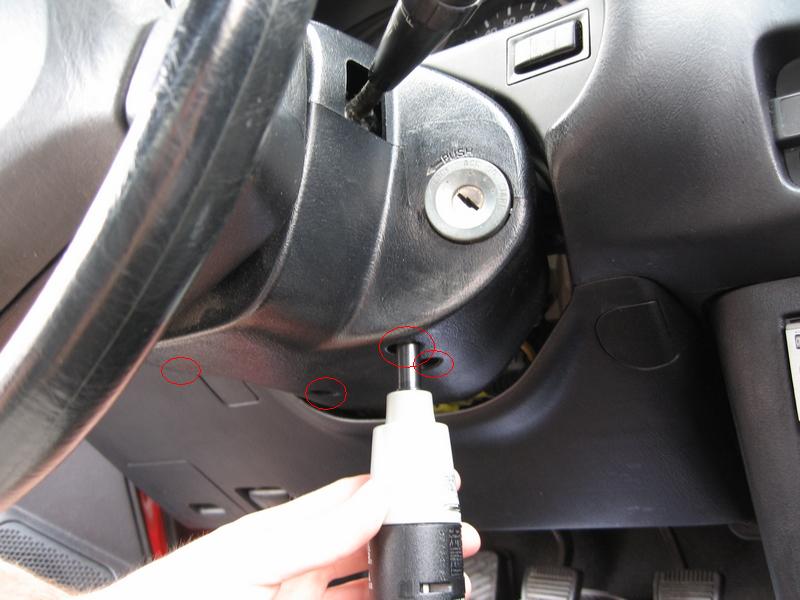
3. take off the dimmer knob by simply pulling it straight out. then take the pliers (or whatever u got) and remove the nut holding the dimmer switch to the dash. pic 04

pic 04
##############################################
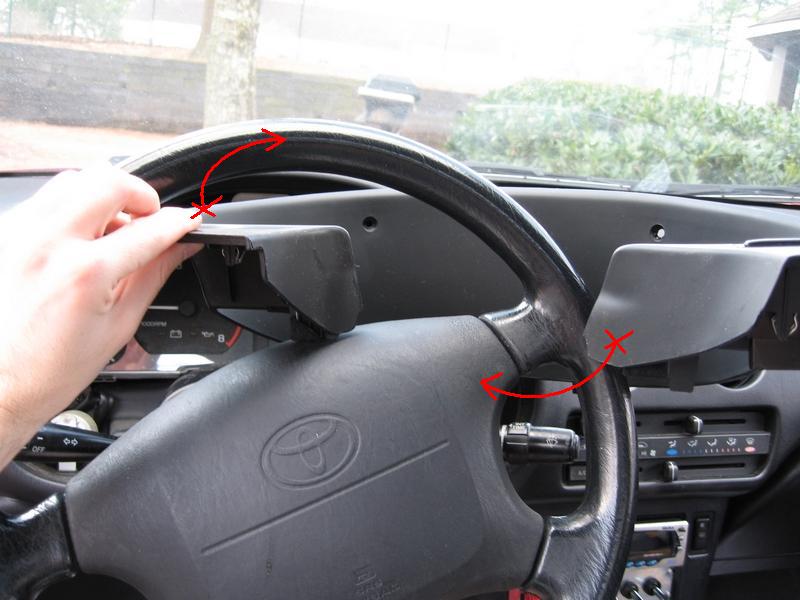
4. now, the trim here just basically needs to be pulled out (would be much easier if I could’ve gotten the steering wheel off….) it is pretty flexible, so don’t worry TOO much about it breaking when trying to manuver it out and bending it every which way. I started off by taking a screwdriver and popping it out from the bottom on each side (pic 05).
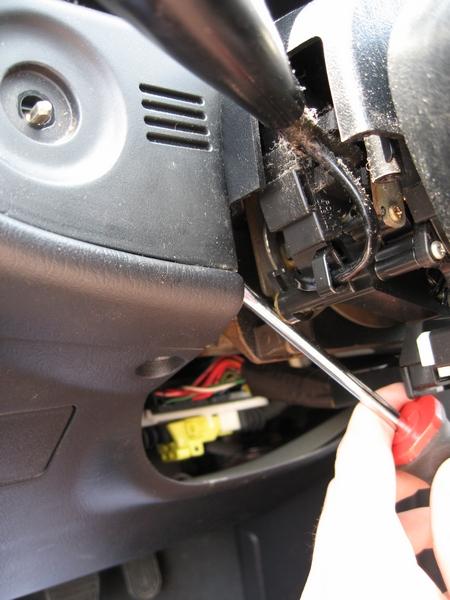
pic 05
then continued to use a thin flat head screwdriver, prying it out where ever it seemed ‘stuck’ until it eventually was ‘unstuck from the dash’ and free to move around behind the steering wheel. (pic 06) — be careful when prying at the trim as it can leave scratches and nicks in the plastic/dash — here, be sure to remove the cable for the hazard lights (simply press down on the ‘lock’ and pull it out — this will be a similar kind of “connection” as the speedo cable later….!) — from here, I kept messing with the trim….bending, turning, manuvering behind/infront of the turn signal and wiper bar, rotating the trim towards me (rotate the ‘green dots’ toward you) until…..
pic 06
I FINALLY got it to where I could “spin” it around the steering wheel and get it out! (pic 07 ) (this can take some time, but again, don’t be too afraid of bending it pretty far….tho still be careful, haha, don’t want to snap it!)
pic 07
##############################################
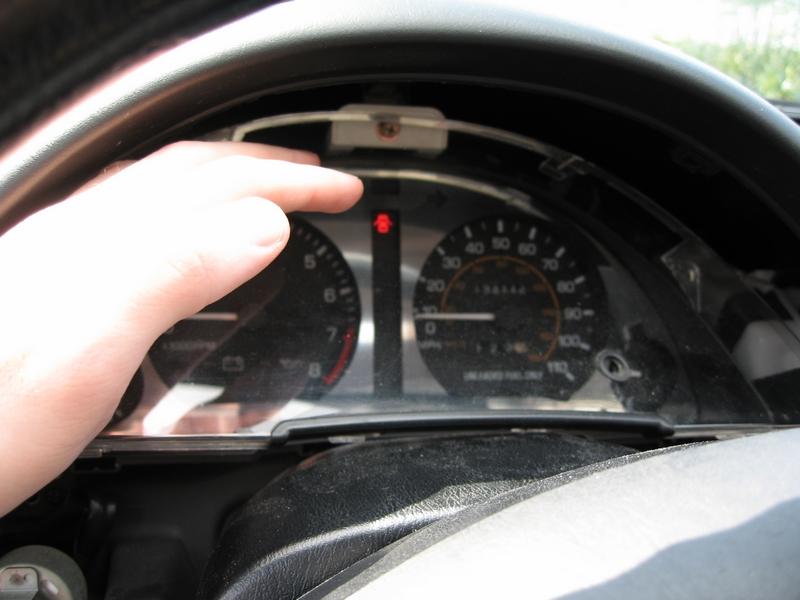
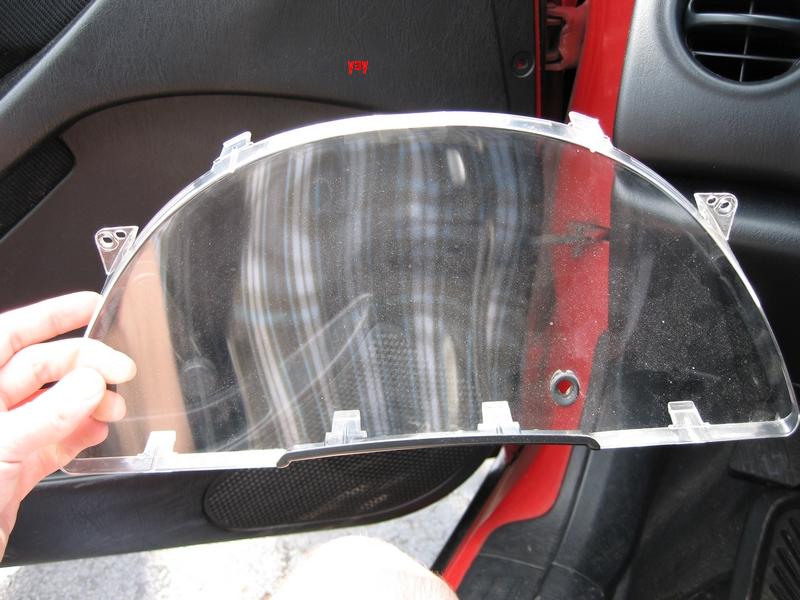
5. now here is where there were a couple of different ways to go, but here’s what I did. i started by removing the clear plastic cover to allow for more “work room” in taking apart the cluster. There are two screws and some …. what are they called…..latches? holding the plastic in place. remove the two screws and push in the latches (pic 08 and 09), and pull off the plastic cover! (pic 10)
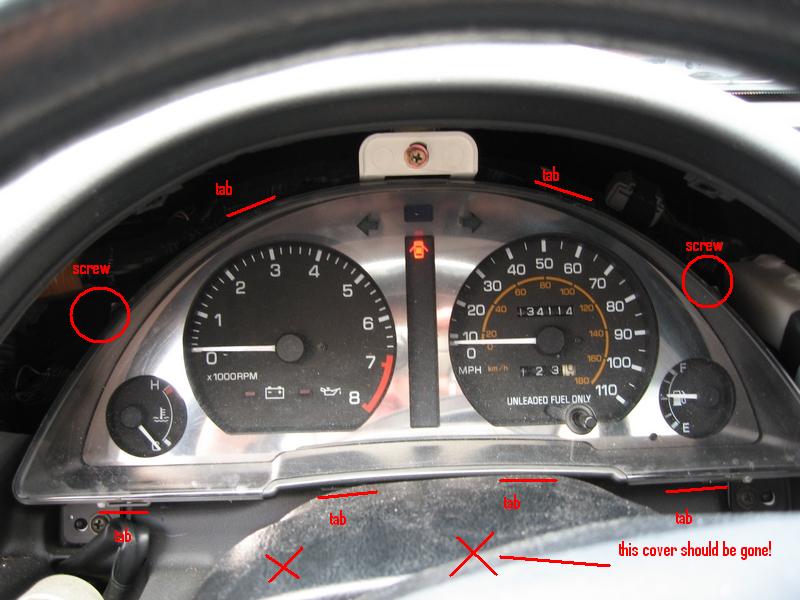
pic 08

pic 09
pic 10
pic 11
##############################################
6. now here is where you could simply add the aluminum bezel if that’s all you are doing. i got mine off ebay, and I had to use a dremel and sand down the top cause it was a bit too tall and then i simply used scotch tape and made it ‘double sided’ by looping it back on itself to secure the bezel. but if ur doin more, you now want to take out these screws (pic 12) to start to get at the speedo and other cables
pic 12
##############################################
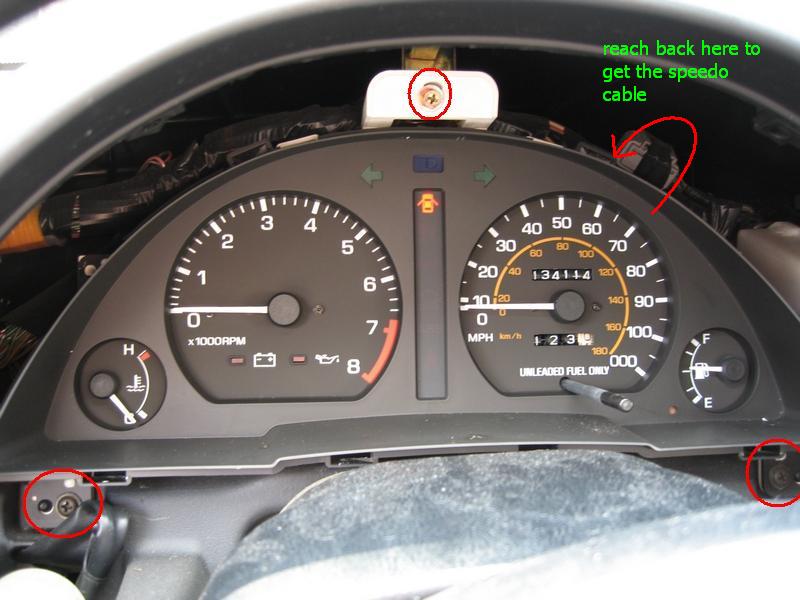
7. aight, so now with those screws taken out, look back at pic 12. on the back of the guage cluster, right at the middle of the speedometer, is the speedometer cable. you should be able to reach your hand behind it and feel the cable — it is attached similarly to the hazard switch in that you have to press down the latch/lock thing that’s on the connection of the cable and the gauge in order to pull it out. i wasn’t able to get my hand in a position where i could push down the latch and pull out, so I went in from underneath by the pedals. if you stick your hand up behind the dash from the floor, you can feel your way up to the speedo cable (you can’t miss it). once you feel it, you’ll eventually find the part that you can ‘press down on’, and with it pressed down, simply pull it out. that’s it. you should be able to get it out, no problem — it may sound confusing when ur reading this, but once you get back there and can feel it, it’ll prolly make more sense
##############################################
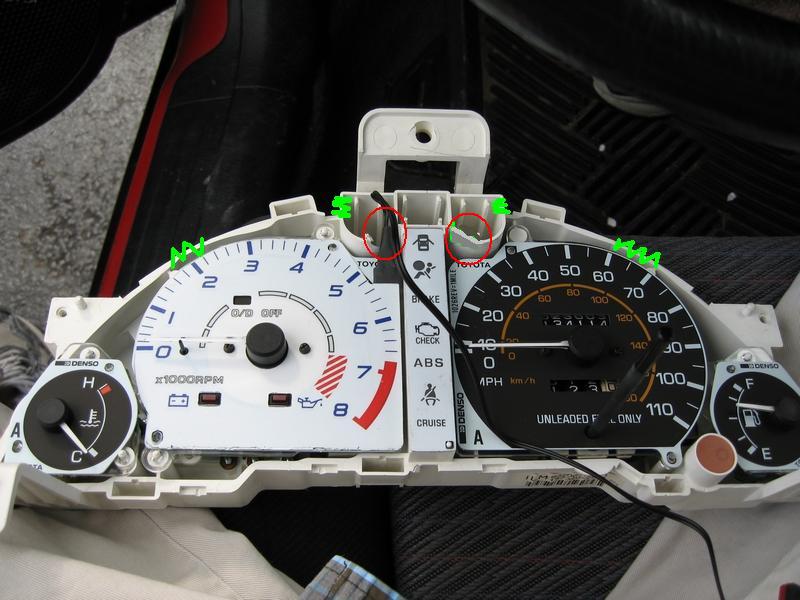
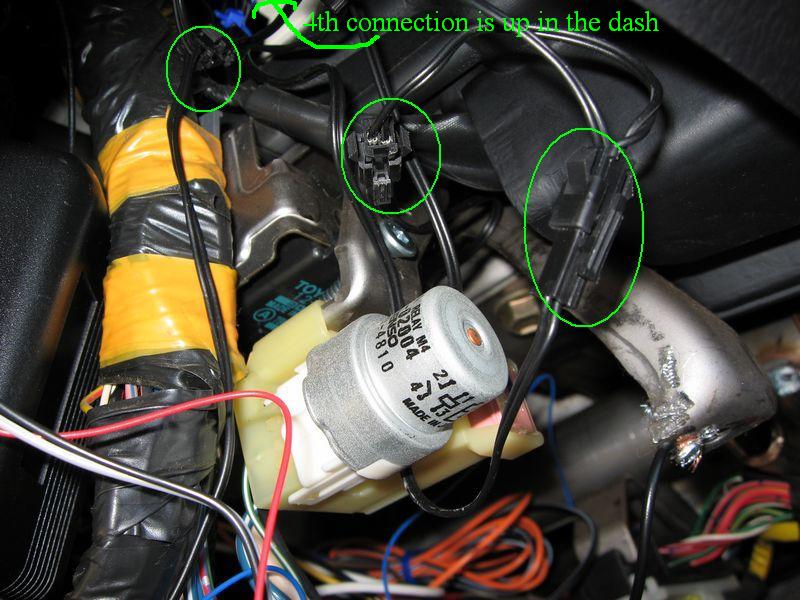
8. now with the speedo cable out, you are able to pull out the cluster quite a bit — enough to detach the other two cables. (pic 13 – red circles). again, just press down on the tab on the middle top and pull out. there’s one on each side.
pic 13
##############################################
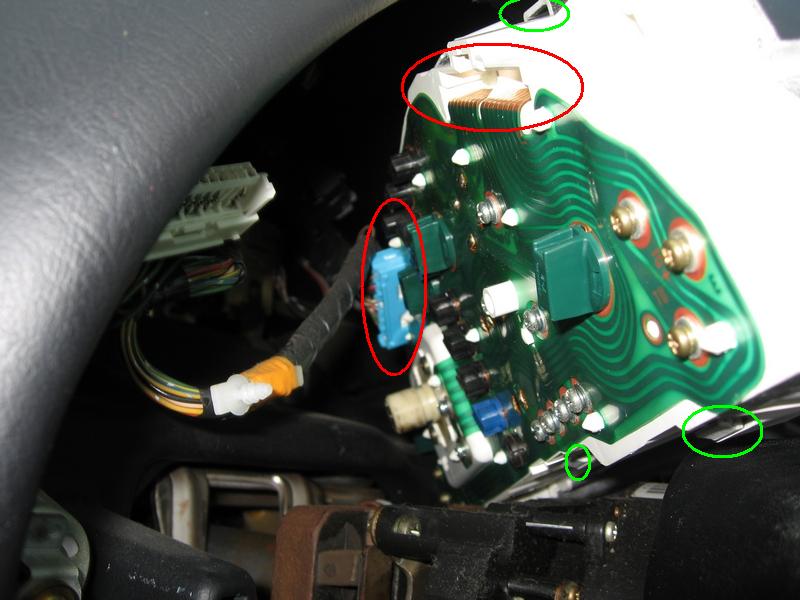
9. now, I thought i could wiggle the cluster out as is, but it is like half and inch too big to fit between the wheel and the dash, so I had to take off the black “housing?” too. there are 5 tabs holding it to the gauges and they were quite stubborn trying to get them unhooked. just use a flat head screw driver to pry off the housing while doing your best in pressing down the tabs and eventually pull it off — again, careful w/prying cause the plastic can break — but don’t worry too much as you’ll never see any screwups back there once it’s back in! . (the tabs: green circles in pic 13 show three of em and pic 14 shows where they are from a front view w/it already off ) — now you can get the gauge cluster out from the dash!! (….SHOULD’VE taken off the steering wheel! ahhh!)
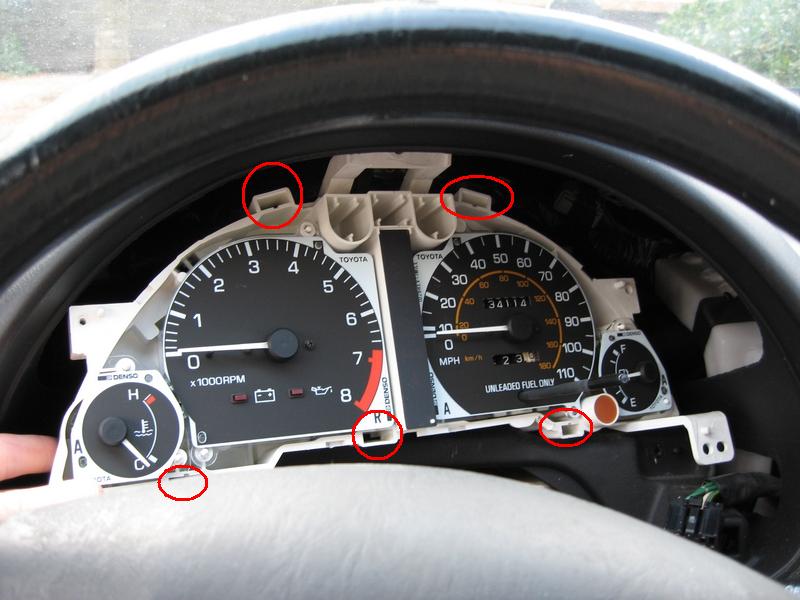
pic 14
##############################################
aight, so now you have the cluster out and you are ready to install the gauges. now my slick self didn’t think to take any pictures of actually sliding the gauges through the needles and stuff, so I’m either going to take it all back out (i have to anyway, i messed up on something i’ll talk about later) or i’ll make a fake setup — it’s kinda hard to describe with out having pictures, so i WILL get back to this step with pics later, but i’ll try do describe now —
what you have to do, is ‘bend’ the cauges at a 90 degree’ish angle (dont’ FOLD and almost make a crease, lol) and the fold should right at the hole for the needle. while holding the needle still (so that it won’t move up and down and therefore come off), simply slide the gauge down the needle until it’s through — i know this isn’t very descriptive, but i’ll get aroudn to making these pictures as soon as possible!!!
############################################
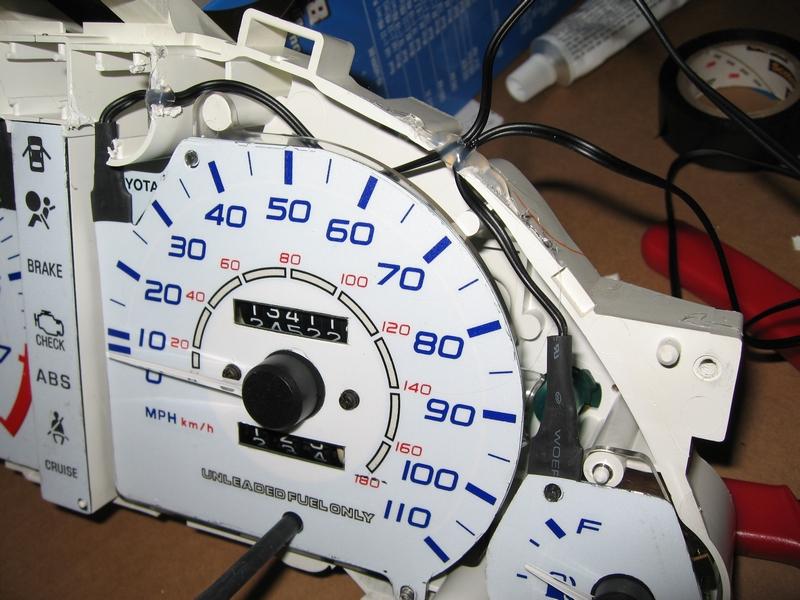
10. what I did was put the gauges on before i made little ‘holes’ for the wires to go, but i think it would’ve been better to make them before putting on the gauges, so here’s what I did (pic 15 – ignore the already installed gauges haha)
pic 15
the green squiggles is where you are going to want to break away (use a dremel or you can also just get plyers and rip/wriggle) about a 1cm length and 1cm depth of plastic for the wires to go through, and then a little bit longer and deeper where the red circles are for the end of the wire lead/connectors from the gauges. (you’ll see if you need to ‘cut’ deeper for the gauge leads if they’re “pushing up” on the gauge faces — you’ll see what i mean if you get to it and havn’t cut deep enough..) — aight, so now you’re ready to install the gauges!!
#############################################
11. *****how to slide gauges through needles, especially the speedo one w/the trip odometer reset switch thing, will come later ******
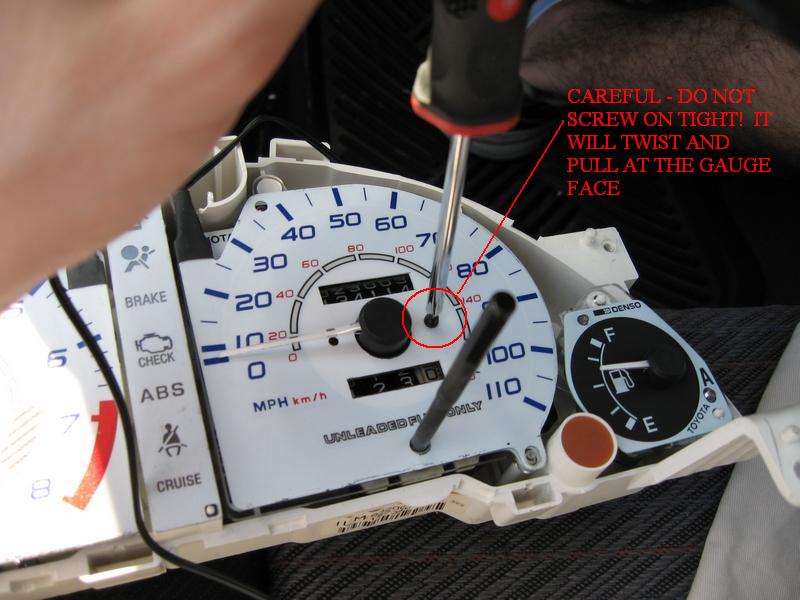
…after you have slid on the speedo and tach gauge face….:
be very careful not to tighten the screws holdin on these faces very tight, i’d almost go as far as to say stop as soon as there’s any resistance, cause i dont’ remember screwing them on very tight, but now the top layer (white) of the gauge faces aroudn the screws are being twisted. I assume it may have something to do w/the heat as it gets to the afternoon, the top layer may loosen from the gauge face and since there’s a ‘turning pressure’ from teh screw, it pulls and twists it (i’ll post pictures of what i’m talking about later )
pic 16
#############################################
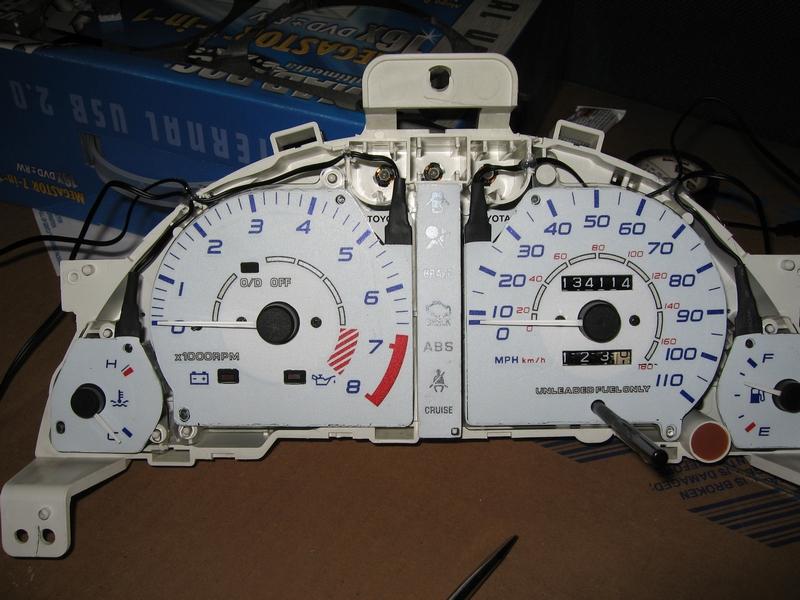
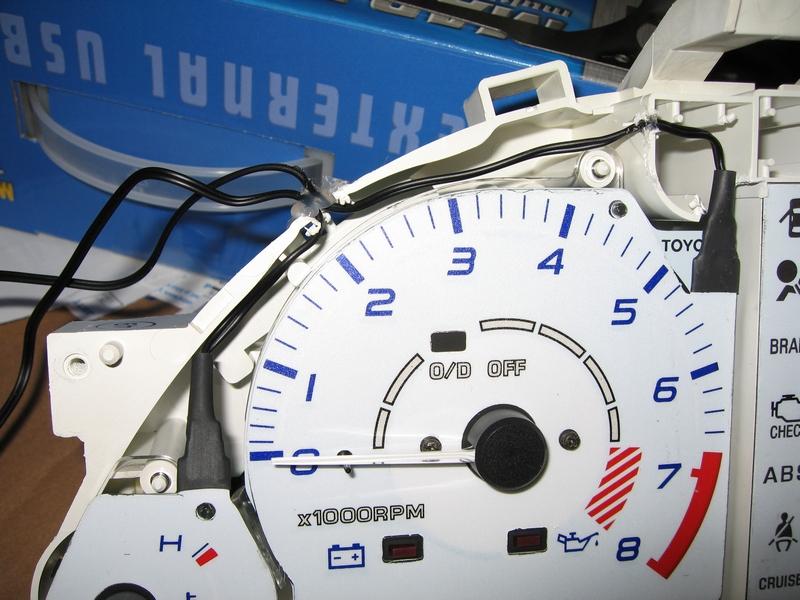
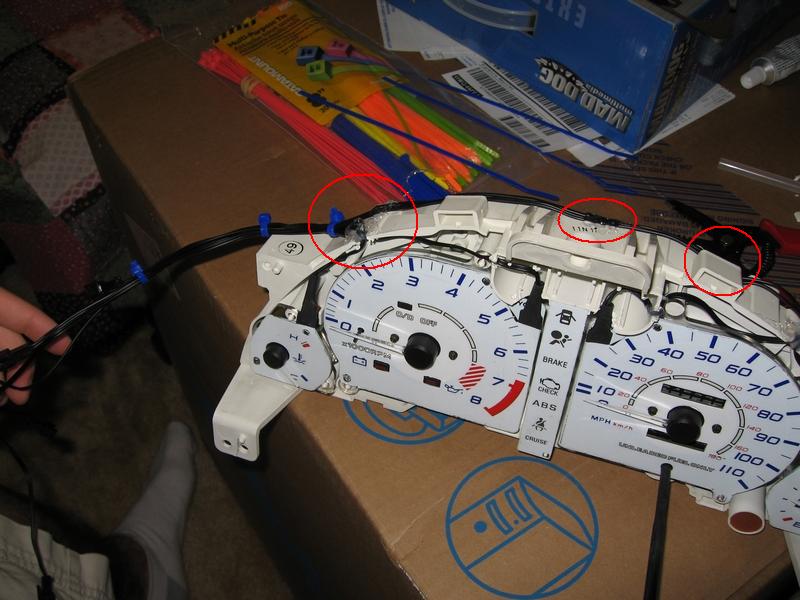
12. now here are some pictures of them installed. I show where i made the cuts and where I glued (red circles in pic 20) — and then used some zip ties to keep the cables together — not much else to say here cept check the pics — oh wait, I did use hot glue at the points where i made the cuts as well, just so the wires would actually stay in there…
pic 17
pic 18
pic 19
pic 20

pic 21
#######################################
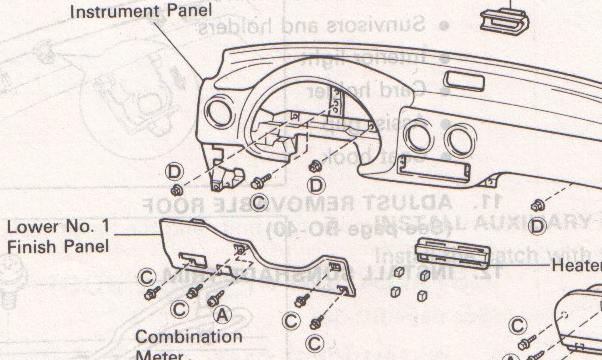
13. now, it’s time to put it all back in (easy part!!) what I did was remove the lower part of the dash by removing the lower dash (pic dash, thanks to Methanoxide for the img) to have easier access to the wires and fuse box and custom ground. (there’s 2 exposed bolts on the bottom left and right, 2 bolts behind ‘cover doors’ which you can’t miss, and then a screw next to the left side of the steering wheel cover)
pic dash
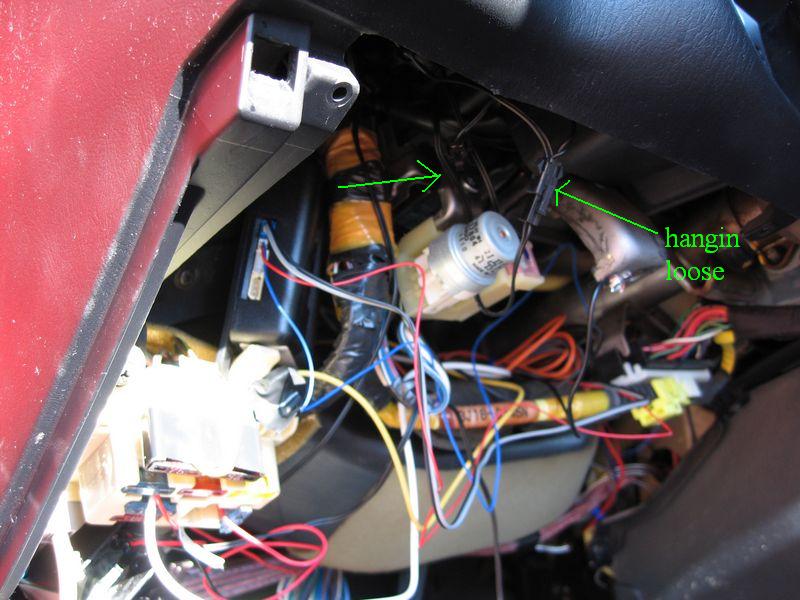
now, put the gauges back through the wheel, connect the two ‘plug cables’ and then the speedo cable. Run the wires for the indiglos to the left and down, and pull them through so they’re just …there lol (pic 22, 23) — you may find it easier to run the cable from the inverter up through the dash and plug em in, that way the ‘shorter cable’ for the gas indiglo is easier to connect (does that make sense?) — either way, just plug in the gauges to the inverter wire and let it all hang loose 8O .
pic 22
pic 23
#######################################
14. power connection — now it just so happens that the power inverter (the black box thing) fits great just under the fuse box, which is where i put mine (see pics below in a sec). now for the power wire, i simply made it piggy back off the fuse for the gauges (far bottom right, or check the pic on the back of your fuse panel/door/thing). i just stripped about 1.5″ of the power wire from the inverter (red wire…) and wrapped it around once one of the prongs of the fuse, and shoved the fuse back in there. (you won’t be able to get the fuse ALL the way back in, but good enough) — is this bad? i dunno…. i’ve been doin it for years, haven’t had a problem yet! (see pic 24)
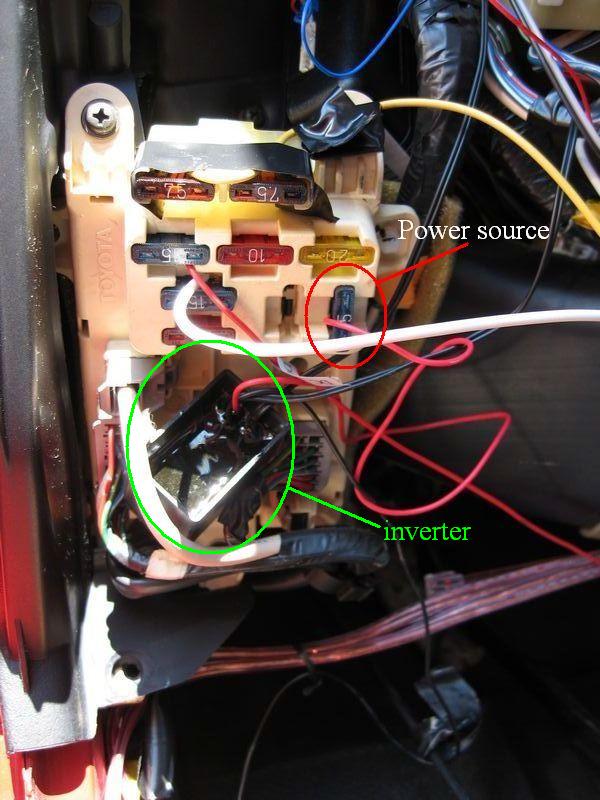
pic 24
now for the ground, i ALWAYS have problems finding a good existing gound that isn’t being used, or i’ll find some bolt somewhere, but can’t loosen it to make it a ground! so what I did was simply remove the lower kick panel thing, drilled a hole, scratched away some of the paint w/the dremel, put in a screw, and there’s your ground. (you can always find another screw/bolt somewhere under the dash that’s connected to something metal and just use that….i just couldn’t find one and was impatient) — pic 25
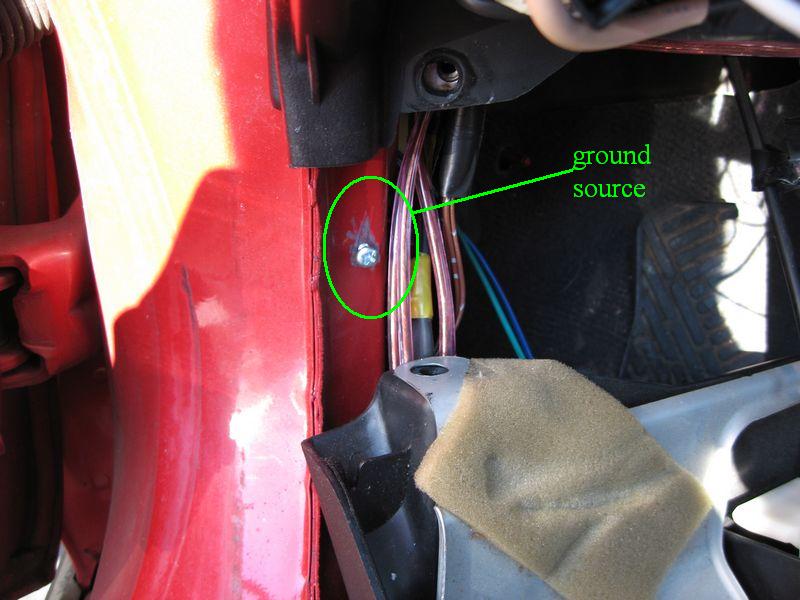
pic 25
#######################################
15. figure out a place to put the strange on/off button — this button is weird, but it’s necessary and it works on the logic of “push the button and the power state will switch” — there’s a word for this kind of button…can’t think of it — but either way, u need a button to switch it on or off, you can’t just hard wire it to power, u need the switch (or any other momentary push button switch) — ANYWAY, i just put it on the underside of the steering wheel cover for now….ima eventually get a push button switch mounted to my switch panel when i remake it…
#######################################
16. TEST to make sure things work!
#######################################
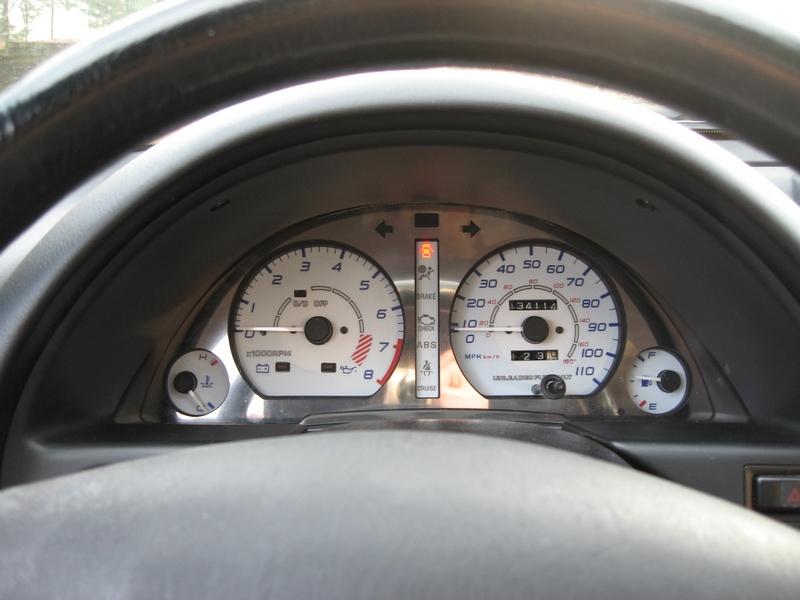
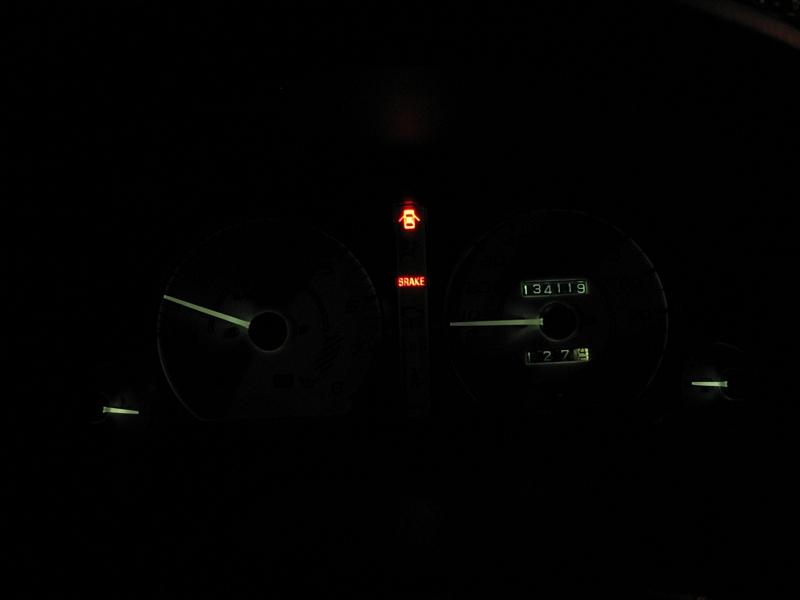
17. put it all back together — screw the gauges back into the dash (if u haven’t already) — attach the black bezel back to the gauges, put back on the plasic clear cover, put back on the dash trim, put back on the steering wheel cover, put back on the lower dash, etc, etc, etc — ENJOY ur new glowage :D 8O :D 8O :D
pic 26
pic 27
pic 28
pic 29

pic 30
where did you buy the indiglo gauges